
Search This Blog

Showing posts with label Html. Show all posts

CSS Syntax and Selectors in Html

 A CSS comprises of style rules that are interpreted by the browser and then applied to the corresponding elements in your document

A style rule is made of three parts:
 - Selector:A selector is an HTML tag at which a style will be applied. This could be any tag like <h1> or <table> etc.
 - Property: A property is a type of attribute of HTML tag. Put simply, all the HTML attributes are converted into CSS properties. They could be color, border etc.
 - Value: Values are assigned to properties. For example, color property can have value either red or #F1F1F1 etc.

You can put CSS Style Rule Syntax as follows:
selector { property: value }
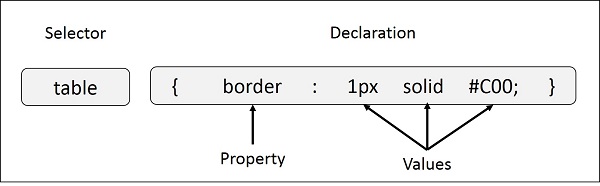
Syntax

Example − You can define a table border as follows:
table{ border :1px solid #C00; }

Here table is a selector and border is a property and given value 1px solid #C00 is the value of that property.
You can define selectors in various simple ways based on your comfort. Let me put these selectors one by one.

The Type Selectors
This is the same selector we have seen above. Again, one more example to give a color to all level 1 headings −
h1 {
   color: #36CFFF; 
}
The Universal Selectors
Rather than selecting elements of a specific type, the universal selector quite simply matches the name of any element type −
* { 
   color: #000000; 
}
This rule renders the content of every element in our document in black.

The Descendant Selectors
Suppose you want to apply a style rule to a particular element only when it lies inside a particular element. As given in the following example, style rule will apply to <em> element only when it lies inside <ul> tag.
ul em {
   color: #000000; 
}
The Class Selectors
You can define style rules based on the class attribute of the elements. All the elements having that class will be formatted according to the defined rule.
.black {
   color: #000000; 
}
This rule renders the content in black for every element with class attribute set to black in our document. You can make it a bit more particular. For example −
h1.black {
   color: #000000; 
}
This rule renders the content in black for only <h1> elements with class attribute set to black.

You can apply more than one class selectors to given element. Consider the following example −
<p class = "center bold">
   This para will be styled by the classes center and bold.
</p>
The ID Selectors
You can define style rules based on the id attribute of the elements. All the elements having that id will be formatted according to the defined rule.
#black {
   color: #000000; 
}
This rule renders the content in black for every element with id attribute set to black in our document. You can make it a bit more particular. For example −
h1#black {
   color: #000000; 
}
This rule renders the content in black for only <h1> elements with id attribute set to black.

The true power of id selectors is when they are used as the foundation for descendant selectors, For example −
#black h2 {
   color: #000000; 
}
In this example all level 2 headings will be displayed in black color when those headings will lie with in tags having id attribute set to black.

The Child Selectors
You have seen the descendant selectors. There is one more type of selector, which is very similar to descendants but have different functionality. Consider the following example −
body > p {
   color: #000000; 
}
This rule will render all the paragraphs in black if they are direct child of <body> element. Other paragraphs put inside other elements like <div> or <td> would not have any effect of this rule.

The Attribute Selectors
You can also apply styles to HTML elements with particular attributes. The style rule below will match all the input elements having a type attribute with a value of text −
input[type = "text"] {
   color: #000000; 
}
The advantage to this method is that the <input type = "submit" /> element is unaffected, and the color applied only to the desired text fields.

There are following rules applied to attribute selector.
 - p[lang]: Selects all paragraph elements with a lang attribute.
 - p[lang="fr"]: Selects all paragraph elements whose lang attribute has a value of exactly "fr".
 - p[lang~="fr"]: Selects all paragraph elements whose lang attribute contains the word "fr".
 - p[lang|="en"]: Selects all paragraph elements whose lang attribute contains values that are exactly "en", or begin with "en-".

Multiple Style Rules
You may need to define multiple style rules for a single element. You can define these rules to combine multiple properties and corresponding values into a single block as defined in the following example −
h1 {
   color: #36C;
   font-weight: normal;
   letter-spacing: .4em;
   margin-bottom: 1em;
   text-transform: lowercase;
}
Here all the property and value pairs are separated by a semicolon (;). You can keep them in a single line or multiple lines. For better readability, we keep them in separate lines.

For a while, don't bother about the properties mentioned in the above block. These properties will be explained in the coming chapters and you can find complete detail about properties in CSS References

Grouping Selectors
You can apply a style to many selectors if you like. Just separate the selectors with a comma, as given in the following example −
h1, h2, h3 {
   color: #36C;
   font-weight: normal;
   letter-spacing: .4em;
   margin-bottom: 1em;
   text-transform: lowercase;
}
This define style rule will be applicable to h1, h2 and h3 element as well. The order of the list is irrelevant. All the elements in the selector will have the corresponding declarations applied to them.

You can combine the various id selectors together as shown below −
#content, #footer, #supplement {
   position: absolute;
   left: 510px;
   width: 200px;
}
Share:

How to use style sheet (css)

 You can use CSS in three ways in your HTML document:
  - External Style Sheet: Define style sheet rules in a separate .css file and then include that file in your HTML document using HTML <link> tag.
  - Internal Style Sheet: Define style sheet rules in header section of the HTML document using <style> tag.
  - Inline Style Sheet: Define style sheet rules directly along-with the HTML elements using style attribute.

Let's see all the three cases one by one with the help of suitable examples.

External Style Sheet
If you need to use your style sheet to various pages, then its always recommended to define a common style sheet in a separate file. A cascading style sheet file will have extension as .css and it will be included in HTML files using <link> tag.

Example
Consider we define a style sheet file style.css which has following rules −
.red {
   color: red;
}
.thick {
   font-size:20px;
}
.green {
   color:green;
}

Here we defined three CSS rules which will be applicable to three different classes defined for the HTML tags. I suggest you should not bother about how these rules are being defined because you will learn them while studying CSS. Now let's make use of the above external CSS file in our following HTML document −
<!DOCTYPE html>
<html>

   <head>
      <title>HTML External CSS</title>
      <link rel = "stylesheet" type = "text/css" href = "/html/style.css">
   </head>

   <body>
      <p class = "red">This is red</p>
      <p class = "thick">This is thick</p>
      <p class = "green">This is green</p>
      <p class = "thick green">This is thick and green</p>
   </body>

</html>

This will produce the following result −


Internal Style Sheet
If you want to apply Style Sheet rules to a single document only, then you can include those rules in header section of the HTML document using <style> tag.

Rules defined in internal style sheet overrides the rules defined in an external CSS file.

Example
Let's re-write above example once again, but here we will write style sheet rules in the same HTML document using <style> tag −
<!DOCTYPE html> 
<html>
 
   <head> 
      <title>HTML Internal CSS</title> 
      
      <style type = "text/css"> 
         .red { 
            color: red; 
         } 
         .thick{ 
            font-size:20px; 
         } 
         .green { 
            color:green; 
         } 
      </style> 
   </head>
 
   <body> 
      <p class = "red">This is red</p>  
      <p class = "thick">This is thick</p>  
      <p class = "green">This is green</p>  
      <p class = "thick green">This is thick and green</p> 
   </body>
 
</html>
This will produce the following result −


Inline Style Sheet
You can apply style sheet rules directly to any HTML element using style attribute of the relevant tag. This should be done only when you are interested to make a particular change in any HTML element only.

Rules defined inline with the element overrides the rules defined in an external CSS file as well as the rules defined in <style> element.

Example
Let's re-write above example once again, but here we will write style sheet rules along with the HTML elements using style attribute of those elements.
<!DOCTYPE html> 
<html>
 
   <head> 
      <title>HTML Inline CSS</title> 
   </head>
 
   <body> 
      <p style = "color:red;">This is red</p>  
      <p style = "font-size:20px;">This is thick</p>  
      <p style = "color:green;">This is green</p>  
      <p style = "color:green;font-size:20px;">This is thick and green</p> 
   </body>
 
</html> 
This will produce the following result −

Share:

Most commonly used tags in HTML

 HTML contains lots of predefined tag. Some of them are described below:
Document structure tag:
HTML tag: It is the root of the html document which is used to specify that the document is html.
Syntax:
<html> Statements... </html>

Example:
<html> 
    <head>  
        <title>Title of your web page</title>  
    </head>  
    <body>HTML web page contents </body>  
</html> 

Head tag: Head tag is used to contain all the head element in the html file. It contains the title, style, meta, … etc tag.
Syntax:
<head> Statements... </head>

Example:
<head>Contains elements describing the document</head>

Body tag: It is used to define the body of html document. It contains image, tables, lists, … etc.
Syntax:
<body> Statements... </body>

Example:
<body>The content of your HTML page</body> 

Title tag: It is used to define the title of html document.
Syntax:
<title> Statements... </title>
Example:
<tittle>tab name</tittle> 

Content container tag:
Heading tag: It is used to define the heading of html document.
Syntax:
<h1> Statements... </h>
<h2> Statements... </h2>
<h3> Statements... </h3>
<h4> Statements... </h4>
<h5> Statements... </h5>
<h6> Statements... </h6>

Example:
<h1>Heading 1 </h1>   
<h2>Heading 2 </h2> 
<h3>Heading 3 </h3>  
<h4>Heading 4 </h4>  
<h5>Heading 5 </h5>  
<h6>Heading 6 </h6> 

Paragraph tag: It is used to define paragraph content in html document.
Syntax:
<p> Statements... </p>
Example:
<p>GeeksforGeeks: Computer science portal</p> 

Emphasis tag: It is used to renders as emphasized text.
Syntax:
<em> Statements... </em>
Example:
<em>GeeksforGeeks</em> 

Bold tag: It is used to specify bold content in html document.
Syntax:
<b> Statements... </b>

Example:
<b>Bold word</b> 

Italic tag: It is used to write the content in italic format.
Syntax:
<i> Statements... </i>

Example:
<i>GeeksforGeeks</i> 

Small (text) tag: It is used to set the small font size of the content.
Syntax:
<small> Statements... </small>

Example:
<small>Example</small> 

Underline tag: It is used to set the content underline.
Syntax:
<u> Statements... </u>

Example:
<u>GeeksforGeeks</u> 

Deleted text tag: It is used to represent as deleted text. It cross the text content.
Syntax:
<strike> Statements... </strike>

Example:
<strike>GeeksforGeeks</strike> 

Anchor tag: It is used to link one page to another page.
Syntax:
<a href="..."> Statements... </a>

Example:
<a href="https://www.geeksforgeeks.org/"> GeeksforGeeks</a> 

List tag: It is used to list the content.
Syntax:
<li> Statements... </li>

Example:
<li>List item 1</li>  
<li>List item 2</li> 

Ordered List tag: It is used to list the content in a particular order.
Syntax:
<ol> Statements... </ol>

Example:
<ol>  
     <li>List item 1</li>  
     <li>List item 2</li> 
     <li>List item 3</li>  
     <li>List item 4</li>  
</ol>  

Unordered List tag: It is used to list the content without order.
Syntax:
<ul> Statements... </ul>

Example:
<ul>  
     <li>List item 1</li>  
     <li>List item 2</li> 
     <li>List item 3</li>  
     <li>List item 4</li>  
</ul>  

Comment tag: It is used to set the comment in html document. It is not visible on the browser.
Syntax:
<!-- Statements... -->

Example:
<!--Comment section-->

Scrolling Text tag: It is used to scroll the text or image content.
Syntax:
<marquee> Statements... </marquee>

Example:
<marquee bgcolor="#cccccc" loop="-1"scrollamount="2" width="100%"> Example Marquee</marquee> 

Center tag: It is used to set the content into the center.
Syntax:
<center> Statements... </center>

Example:
<center>GeeksforGeeks</center> 

Font tag: It is used to specify the font size, font color and font-family in html document.
Syntax:
<font> Statements ... <font>

Example:
<font face="Times New Roman">Example</font>  

Empty (Non-Container) Tags:
Line break tag: It is used to break the line.
Syntax:
<br>

Example:
GeeksforGeeks<br>A computer science portal 

Image tag: It is used to add image element in html document.
Syntax:
<img>

Example:
<img src="gfg.jpg" width="40" height="40" border="0"> 

Link tag: It is used to link the content from external source.
Syntax:
<link>

Example:
<head> 
<link rel="stylesheet" type="text/css" href="style.css"> 
</head> 

Horizontal rule tag: It is used to display the horizontal line in html document.
Syntax:
<hr/>

Example:
<hr width="50%" size="3" /> 

Meta tag: It is used to specify the page description. For example: last modifier, authors, … etc.
Syntax:
<meta> Statements ... <meta>

Example:
<meta name="Description"   content="Description of your site">  
<meta name="keywords"  content="keywords describing your site"> 

Tables Tags: Table tag is used to create a table in html document.
Table tag:
Syntax:
<table> Statements... </table>

Example:
<table border="4" cellpadding="2" cellspacing="2" width="100%">  
<tr> <td>Column 1</td> 
<td>Column 2</td> </tr> </table> 

Tr tag: It is used to define row of html table.
Syntax:
<tr> Statements... </tr>

Example:
<table> 
  <tr> 
    <th>Month</th> 
    <th>Savings</th> 
  </tr> 
  <tr> 
    <td>January</td> 
    <td>$100</td> 
  </tr> 
</table> 

Th tag: It defines the header cell in a table. By default it set the content with bold and center property.
Syntax:
<th> Statements ... <th>

Example:
<table> 
 <tr> 
   <th>Month</th> 
   <th>Savings</th> 
 </tr> 
 <tr> 
   <td>January</td> 
   <td>$100</td> 
 </tr> 
</table> 

Td tag: It defines the standard cell in html document.
Syntax:
<td> Statements ... <td>

Example:
<table> 
  <tr> 
    <td>Cell A</td> 
    <td>Cell B</td> 
  </tr> 
</table> 

Input Tags:
Form tag: It is used to create html form for user.
Syntax:
<form> Statements ... <form>

Example:
<form action="mailto:you@yourdomain.com "> 
  Name: <input name="Name" value="" size="80"><br> 
  Email: <input name="Email" value="" size="80"><br>  
  <br><center><input type="submit"></center> 
</form> 

Submit input tag: It is used to take the input from the user.
Syntax:
<input>

Example:
<form method=post action="/cgibin/example.cgi"> 
<input type="text" style="color: #ffffff; 
 font-family: Verdana; font-weight: bold; 
 fontsize: 12px; background-color: #72a4d2;"  
 size="10" maxlength="30">  
<input type="Submit" value="Submit">  
</form> 

Dropdown option tag: It is used to select an option froma drop-down list.
Syntax:
<option> Statements ... <option>

Example:
<form method=post action="/cgibin/example.cgi">  
<center> Select an option:<select> 
<option>option 1</option> 
<option selected>option 2</option> 
<option>option 3</option>  
</form>  

Radio button tag: It is used to select only one option from the given options.
Syntax:
<input>

Example:
<form method=post action="/cgibin/example.cgi">  
Select an option:<br>  
<input type="radio" name="option"> Option 1 
<input type="radio" name="option" checked> Option 2 
<input type="radio" name="option"> Option 3  

Share:
Powered by Blogger.

Recent Posts

Pages